Data Entry & Management
Training data entry
The system supports data entry in different modalities including manual entry, fetching data from other systems like DHIS2, lifebox learning network and via importing data with standardized templates. Training setting under training management menu allows permitted users to manage training related variables (edit, delete, add). Additionally training related data can be entered by using training participants sub menu.
By clicking training participants trainees profile and training courses can be added by newly added, inline edition and editing options by selecting already recorded trainees' profile.
Data from lifebox learning network summarized by course, participant and course analytic options. This submenu is included in the system structure but does not contain active functions. Its primary purpose is to facilitate data retrieval from the lifebox learning network.
Attendance summarized sessions based on training attendance.
Exam and test administration sub menu allows for pre-post testing evaluation and training impact evaluation. Test takers can be registered by using email or QR code scan options via test takers portal.
Test administration allows to design the questions, have summary dashboard responses and participants summary.
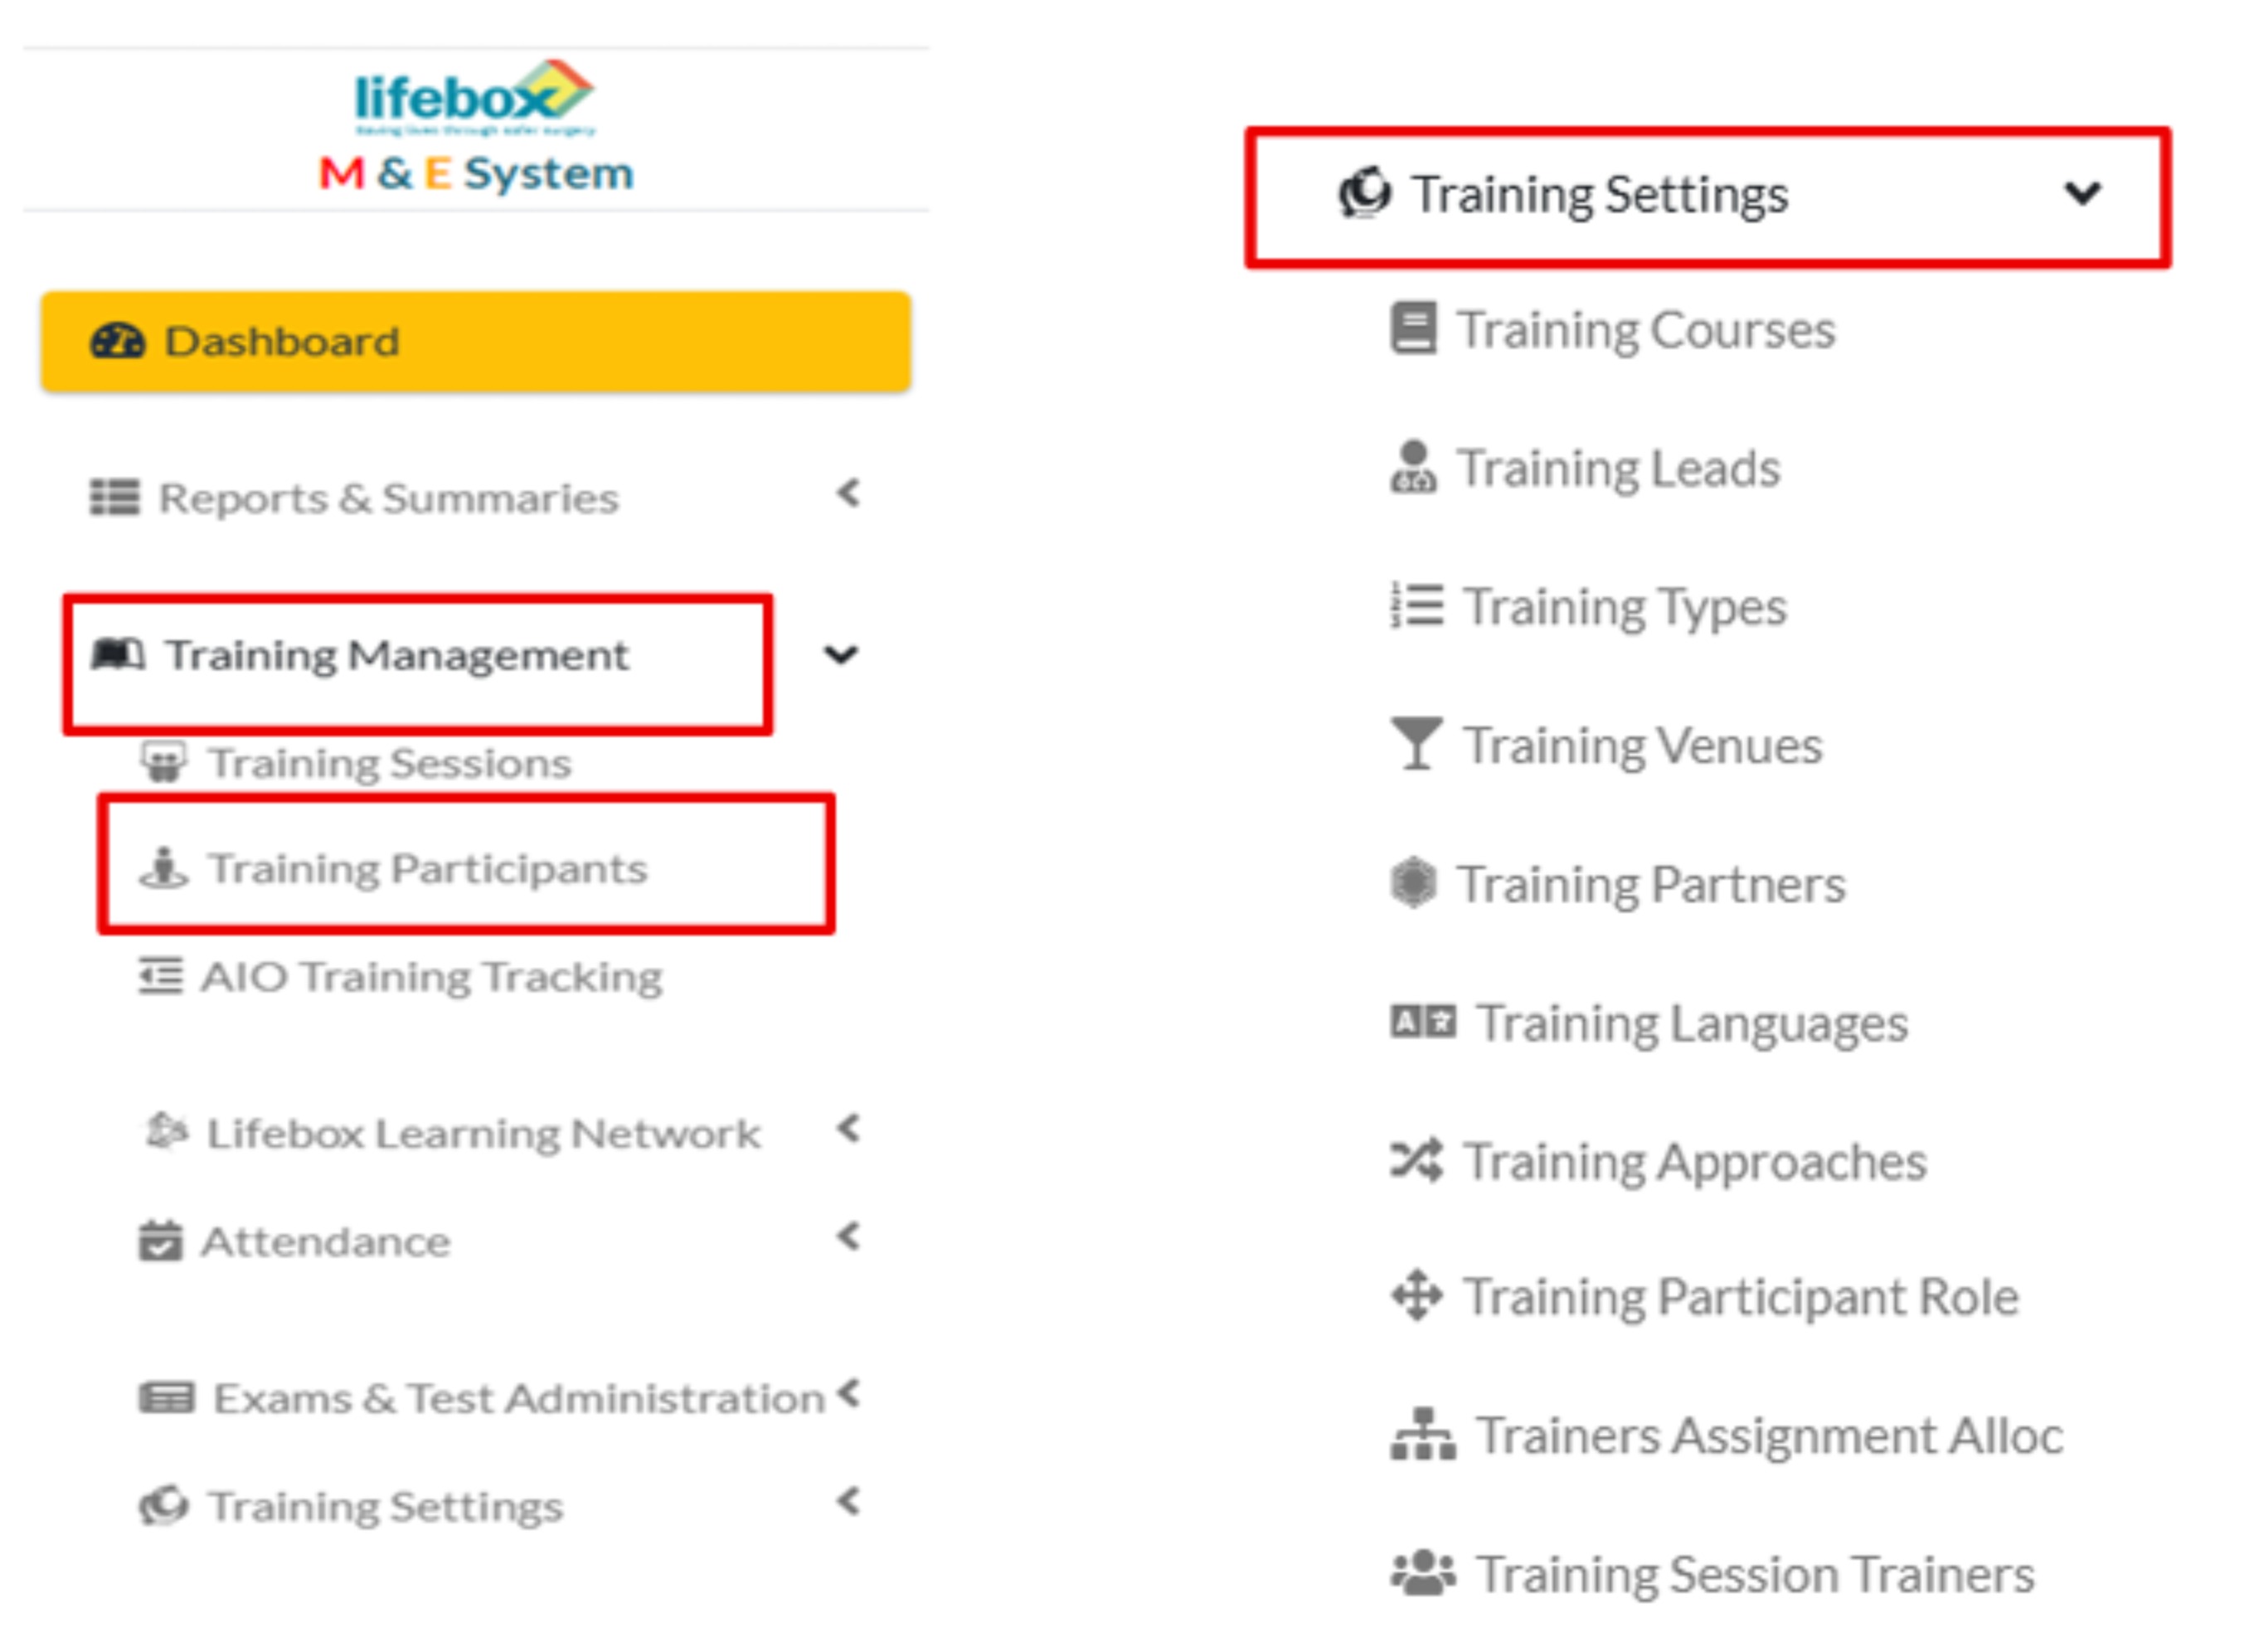
Figure 7. Training data management, variable setting and entry
Device distribution data entry
Like the training data entry, the system supports manual data entry and through importing standardized templates for device distribution. Device distribution log and device inventory changes were auto calculated and no actual data entry takes place in these sub menus.
Device distribution: The system allows users to add new records, inline adding and update existing information when required by selecting the existing record. These features enable users to capture and manage different variables, including surgical volume at health facility level, the status of use at the receiving facility.
Devices: uses to capture information about the device type, available quantity and total quantity at warehouse level.
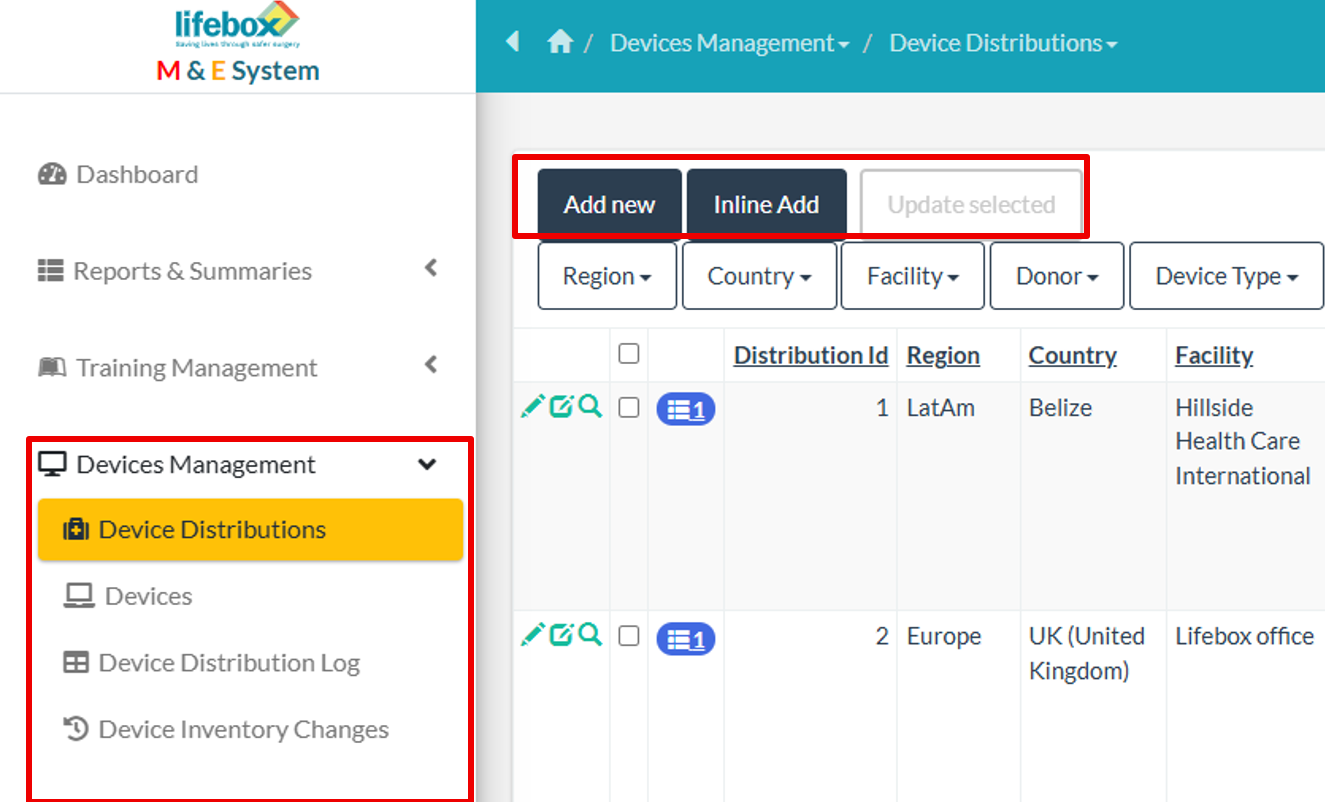
Figure 8. Device distribution and devices data management
Lifebox PMI setting and data entry
Lifebox PMI menu allows PMI setting and actual entries via calculated fields or manual entry. The PMI settings menu is accessible to users with authorized permissions to add, delete, and edit indicator groups, data elements, data sets, indicators and targets.
Lifebox PMI primarily focused on outcome indicators and result areas defined in the logical framework.
Data elements: these are either denominators or numerators defined for the proposed outcome indicators
Data entry takes place in the indicator target, data value, and indicator actuals menus. The data value section is used to enter values for data elements, while the indicator actuals section allows users to enter indicator values at the regional, country, and facility levels. Within indicators target, targets and baselines can be entered. Editing options allow for editing for all entered values whenever needed.
Setting Indicator groups
Indicator groups are result areas listed in the logical framework.
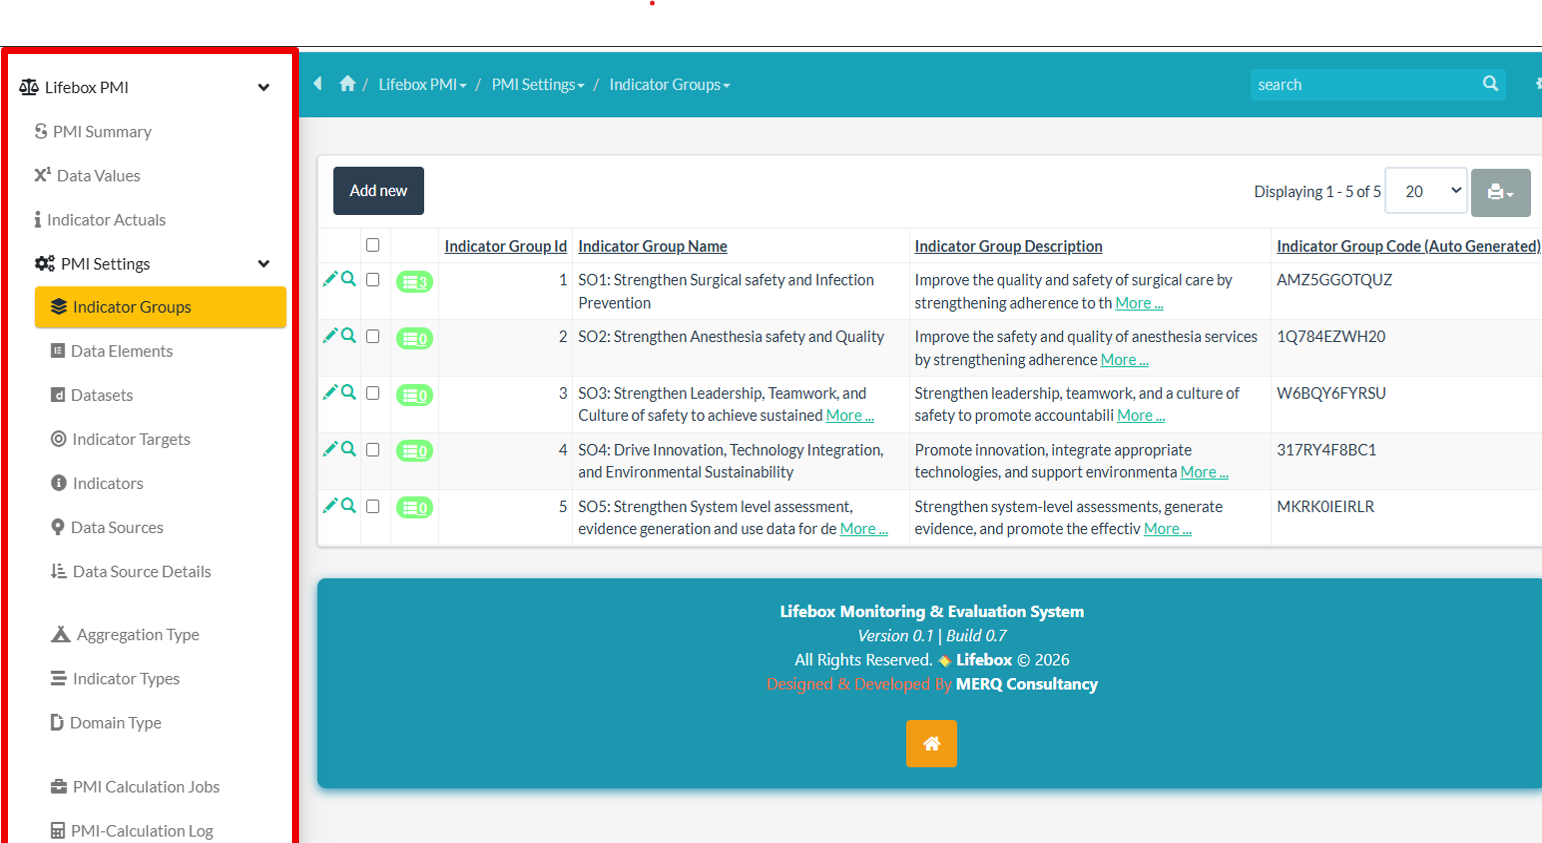
Figure 9. PMI Data Settings and Entry interface for managing indicators and entering program data
Setting data set
After defining indicator group the next step is setting the dataset. It is the menu where a data set which serve as a parent for data element were added. It was designed based on the result areas defined on indicator groups. 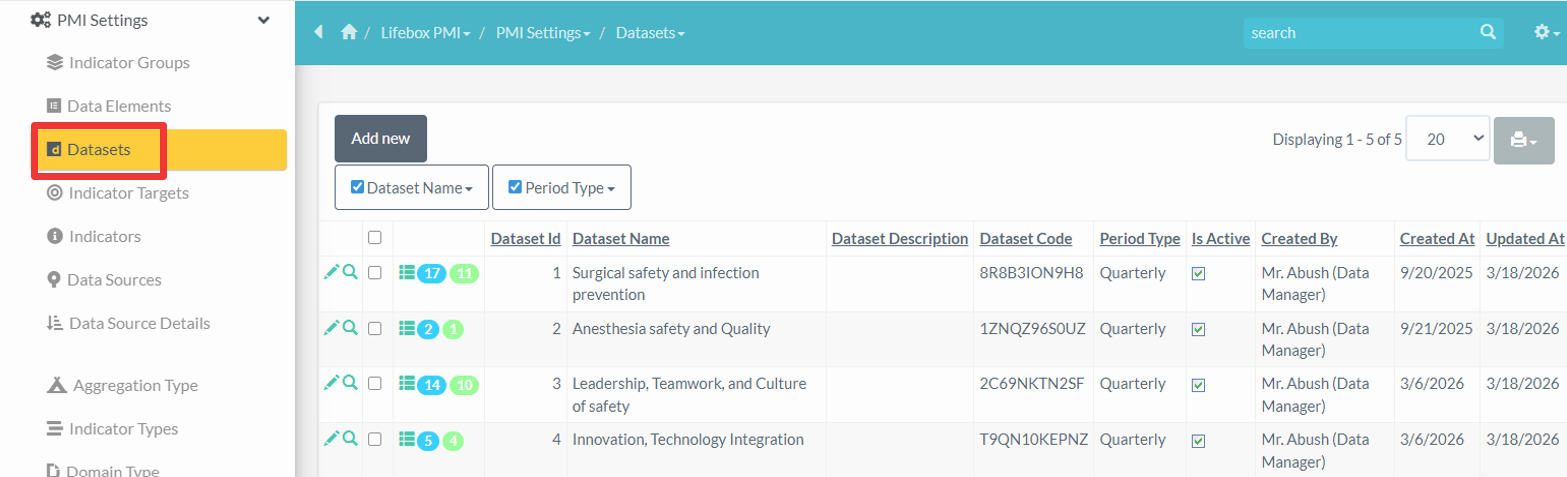 Figure 10
Setting data elements
Clicking data elements allows reportable data elements displays the data element name, indicator group, domain type, aggregation type, and value type. Clicking add new allows user to select dataset ID and indicator group from drop down list. Data element name, value type, domain type and aggregation type should be selected based on data element types. Whenever possible add indicator description and mark "Is Active" which ensures calculation to run in the future.
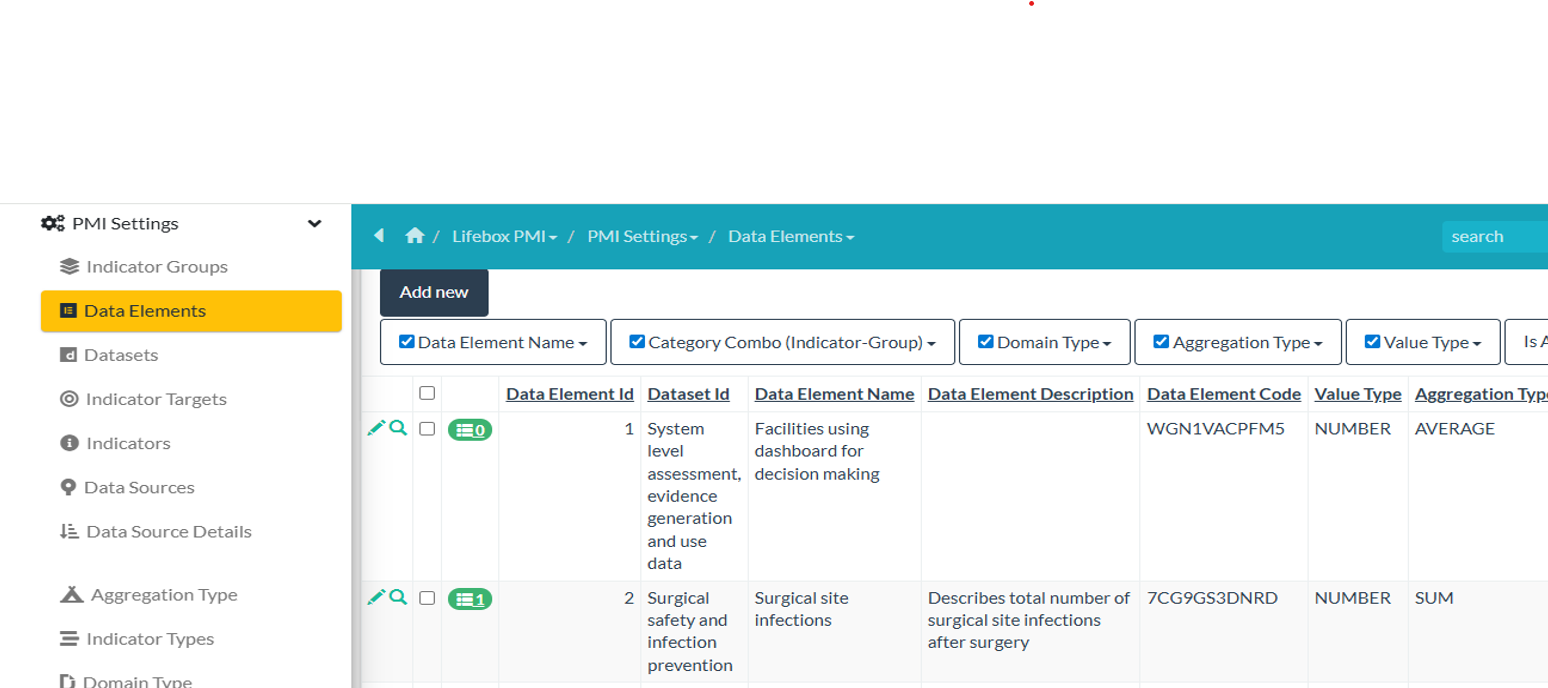 Figure 11
Setting the indicators
Clicking indicators in the left menu displays already defined indicators and add new option in the result area.
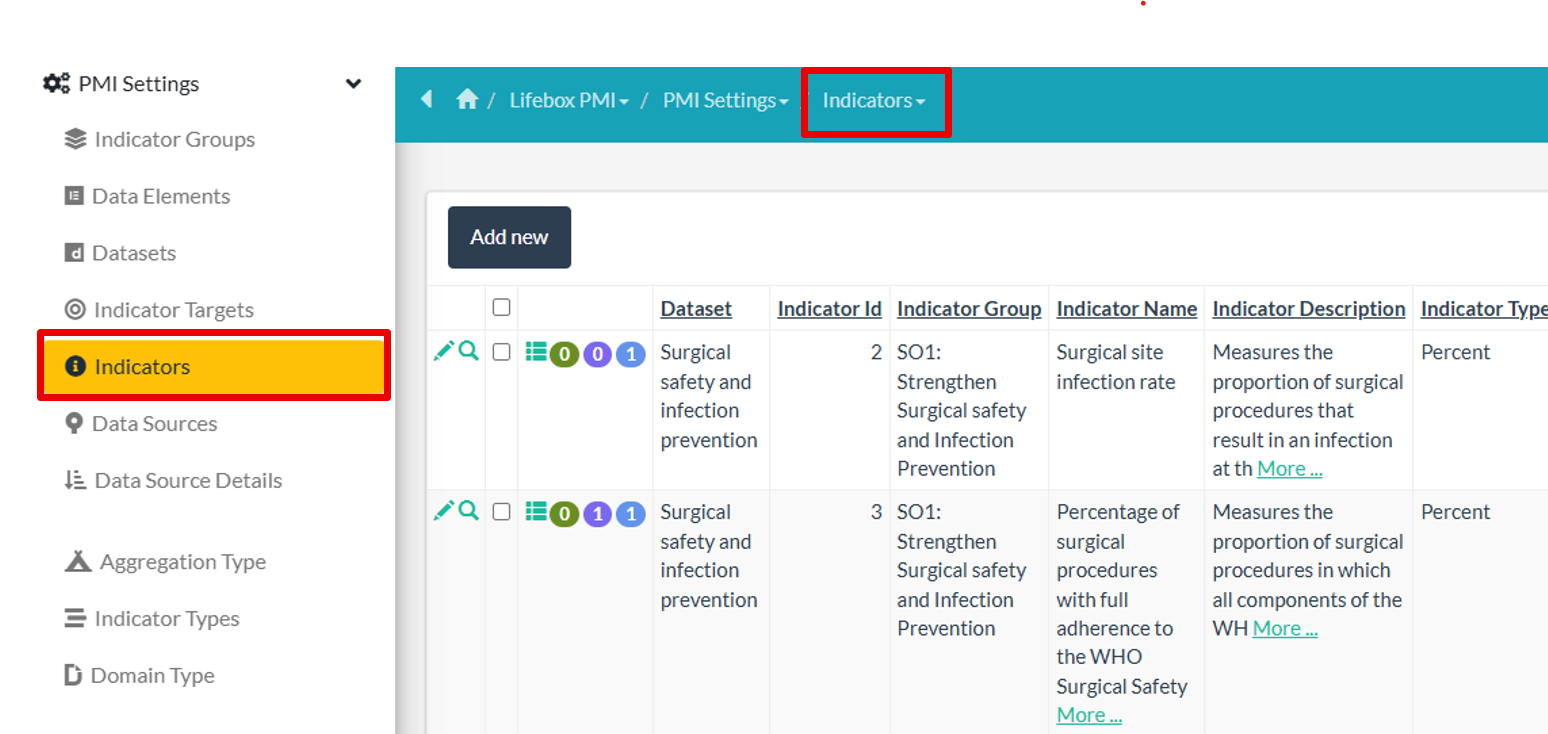 Figure 12
Add new indictors provides options for selecting data sets, indicator groups from dropdown selection options. Indicator name, type, numerator and denominator (if applicable) and formulas should be put in place. If the indicator compares performance against the annual target marking annualized is important. 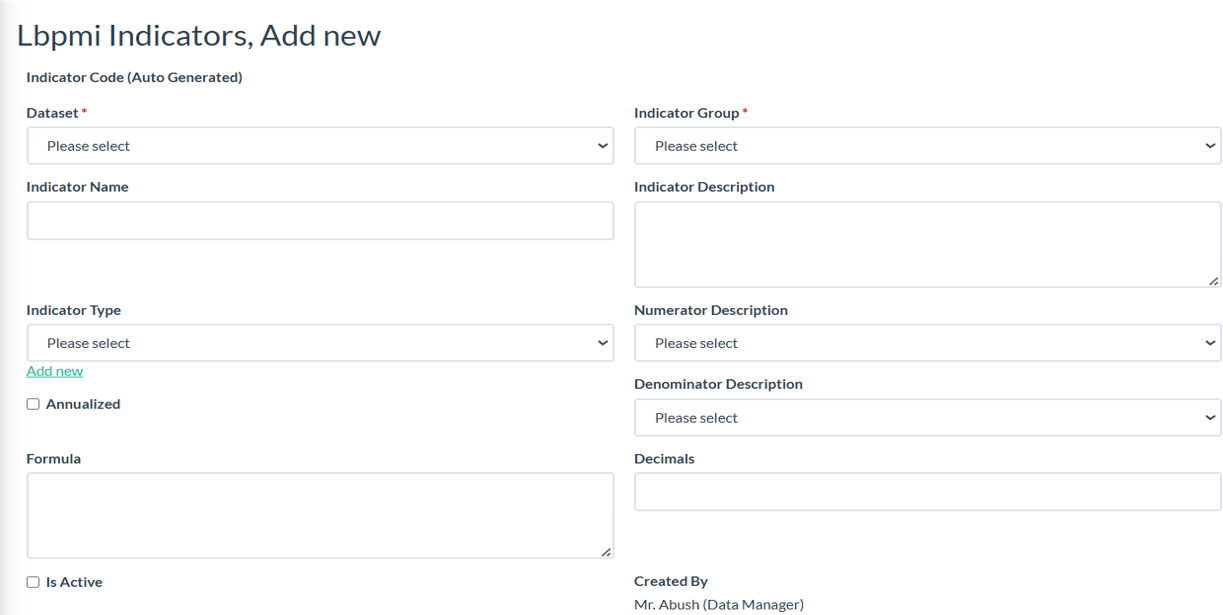 Figure 13
Data entry for the data elements
Data entry will take place for outcome indicators via interoperability with DHIS2, entry for data element level or actual entries for the indicators. Clicking on data values displays add new, different filtering options and already entered data in the result page. Data values represent here actuals for data elements which can serve as the numerator or denominators while we set the indicators.
Clicking add new tab allows users to define select the data element, period, geographic coverage, value and data source and data source details when required.
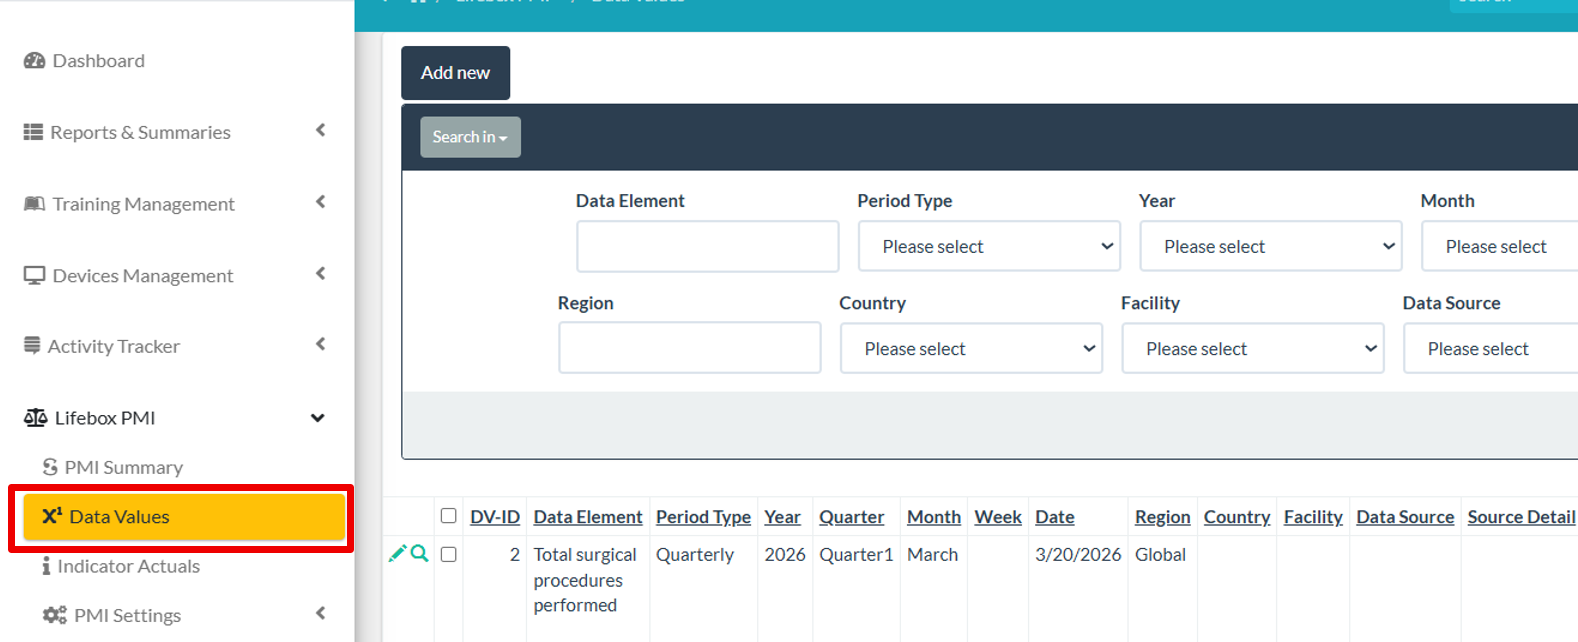 Figure 14
Data entry for the Indicators
Data entry for the indicators or indicator data actuals allows users to enter processed data at indicator level. Clicking indicator actuals presents add new options, already entered indicator values and filtering options. Clicking add new gives options for users to select the indicator, reporting organization unit (Global, categorized regions, countries and facilities) period and actuals.
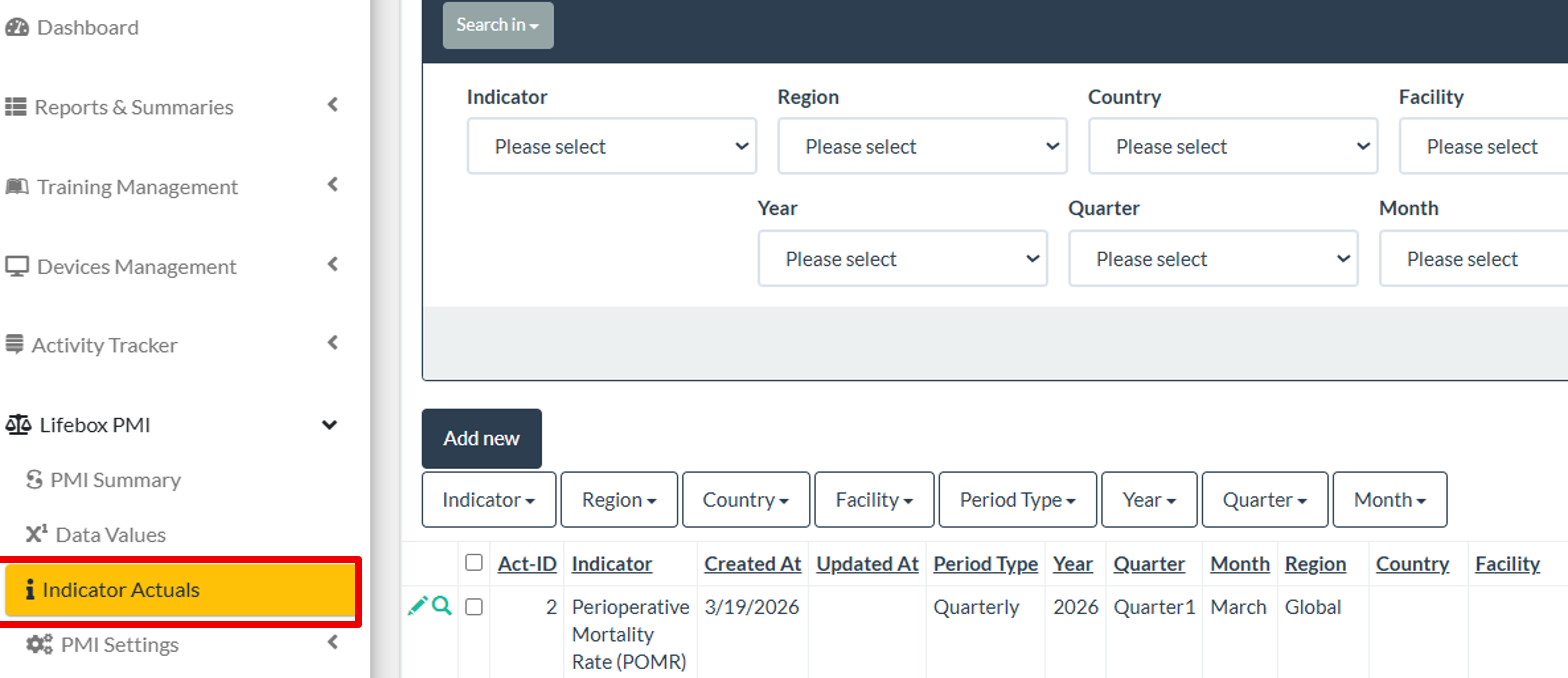 Figure 15
Data Management
Data entry standards
To ensure data quality, consistency, and reliability, users must follow the established data entry standards when entering information into the system. Adhering to these standards helps maintain accurate records and supports effective monitoring and reporting.
General Standards
- Accuracy: Ensure that all data entered into the system accurately reflect the original source documents.
- Completeness: All required fields must be completed before saving or submitting data.
- Timeliness: Data should be entered into the system within the specified reporting timelines.
- Consistency: Use standardized formats, definitions, and units as defined in the system guidelines.
- Verification: Users should review and verify data before submission to minimize errors.
Data Entry Procedures
- Enter data only in the designated fields and follow the instructions provided in the system.
- Avoid entering duplicate records.
- Use the correct reporting period when entering data.
- Ensure that the appropriate facility, region, or country level is selected before saving the entry.
Data Validation
- The system may apply automatic validation rules to detect incomplete or incorrect entries.
- Users should correct any flagged errors before finalizing the data entry.
User Responsibility
All users responsible for data entry must ensure that the information entered into the system is accurate, complete, and supported by appropriate documentation.
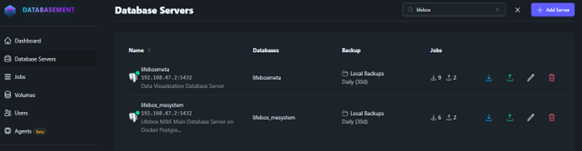
Data backup procedures
Data backup procedures are implemented to ensure that system data are protected and can be recovered in case of system failure, data loss, or other unexpected events. Regular backups help maintain data security and continuity of system operations.
Backup Process
- The system performs regular backups of the database to prevent data loss.
- Backups may be conducted automatically by the system or managed by the system administrator, depending on the system configuration.
- Backup copies are stored in secure locations to ensure data safety.
Backup Process
User Responsibilities
- Users should ensure that data is entered and saved properly before exiting the system.
- Important files or documents uploaded to the system should also be kept in secure local or institutional storage when required.
Data Recovery
- In the event of data loss or system malfunction, the system administrator or technical support team can restore data from the most recent backup.
- Users should report any suspected data loss immediately to ensure timely recovery.
Security Considerations
- Access to backup files is restricted to authorized personnel.
- Backup procedures follow established data security and confidentiality standards.